 Random lengths of wood flooring are loosely fit into place before they are secured to the subfloor. |
There are three basic options when it comes to fastening hardwood floors. The most common is blind nailing, often used with 2-1/2-inch, tongue-and-groove strip flooring. A second common option for strip flooring is screws and plugs. When completed, both blind nailing and screws and plugs hide the fasteners from view. Face nailing, which leaves the fasteners visible on the finished floor, is seen in older, rustic homes and can be used to accent a period floor.
Blind Nailing
Most common by today’s standards, blind nailing is often used on strip flooring milled from various species of hardwood. This method works best with hardwoods as only half of the thickness is being used for structural integrity. With this method of fastening the nails are concealed in the tongue and groove joint. The tongue part of the pairing is used to fasten the material to the subfloor. The work is most quickly accomplished with a pneumatic flooring nailer, although air-powered tools are not necessary for a quality installation. Flooring nailers, which both force boards tightly together and drive a fastener, called a cleat, are often used in blind nailing applications.
 Readily available at tool rental stores, a flooring nailer drives fasteners in blind nailing applications. A hammer strikes the pad on the nailer to force a board tight against the previous course, while also driving a fastener through the flooring and into the subfloor. Image courtesy of Bostitch. |
When using a flooring nailer, the nose of the tool is set down on the top inside corner of the board’s tongue while the nail is driven at an angle through the flooring material and into the subfloor. The tool establishes the angle at which the nail is driven, so there no guesswork when the tool is operated properly. A heavy blow hammer strikes the pad on top of the nailer. This drives the material down and back into the neighboring piece, creating a tight joint between the two. Since the tool moves the wood as it sets the nails, it is important to face nail the first two courses completely so that the subsequent boards do not go off line.
Typical installations use 2-inch barbed flooring nails spaced no more than 12-inches along the length of each board. It’s best to check the length of the flooring nail against the subfloor conditions. If, for example, there is radiant tubing beneath the subfloor, the nail must be short enough to not puncture any of the water lines. The length of the nail and the depth of penetration determine how securely and safely the floor is fastened. Even if the location of the radiant tubing is known, it is best never to risk a puncture. At the same time, there must be enough depth to hold the floor securely to the substrate. It is always best to drive a few nails into a test piece of flooring to check the finish depth of the nail and the angle of the tool.
Screwed and Plugged
Screws and plugs work best with wide-plank flooring that is milled square at the edges. Screwing down the floor can be time consuming, so it’s best to have a system for drilling countersink holes, setting the boards with screws, and then plugging. A good method is where one person measures and cuts the material, while two others set the boards, counter sink, and screw them down. For best results, make a jig that will line up the nails in each new board with those in the last and give an even space between them. A common jig is simply a piece of scrap plywood cut to a length equal to the width of two boards. A small strip of wood nailed along one edge, like a lip, lets it rest against the tongue of the board being installed. The location of the screws is then marked on the jig. The jig covers the board to be set and the previous board, so it helps align the screws from one board to another.
 1. Using a plug-cutting bit, a 3/8-inch diameter hole is bored into the top face of the flooring. |
 2. Square-drive screws are set into the hole bored into the flooring material securing it in place. |
|
 3. Once the screw is in place, plugs are coated with glue and tapped into the holes. |
 4. Excess plug material is sheared off with a Japanese-style saw or a sharp chisel. Sanding the floor before finishing it removes any additional plug material. |
|
The subfloor is often used as an anchor when screwing down the floor and closing the gaps. You can work against it to hold the boards tight while you work. For example, hand-driven nails can be set at an angle to hold the new board tight against the previous board until the screws are secured.
For boards with a stubborn curve to them, two wedges can be cut out of flooring scraps to hold a board tight while securing it in place. Screw one wedge to the subfloor and drive the other wedge between the secured piece and the tongue edge of the new flooring piece. Since one wedge is temporarily fastened to the subfloor and the other wedge is driven between the new piece and the fixed wedge, this closes the gap between flooring boards while the screws or nails are set. Once the board is secure, the wedges can be removed and used again.
For the best results, use Phillips head, or square drive, screws. They are much easier to drive tight and resist stripping. Plugs should be milled from the same material as the flooring, so that shrinking and swelling occur at the same rate. A 3/8-inch plug-cutting bit can be purchased at most hardware stores, and is best used in a drill press. Damaged or split flooring pieces are good material source for cutting plugs.
 Blind nailing tongue-and-groove flooring hides fasteners from view. |
 Wedges made from scrap wood can be used to hold a board tight while securing it in place. |
 A simple jig made from scrap wood can be used to align fasteners on the face of floor boards. |
||
Plugs are set once the entire installation is complete. To set plugs properly, first orient them so that the grain of each plug follows that of the plank. Then, place a drop of glue in the countersink hole and lightly tap the plug in place. Plugs should never be pounded as they may break and are very difficult to remove. A sharp chisel or Japanese-style saw can be used to trim the tops of the plugs just above the surface of the flooring. The rest can be removed when the floor is sanded.
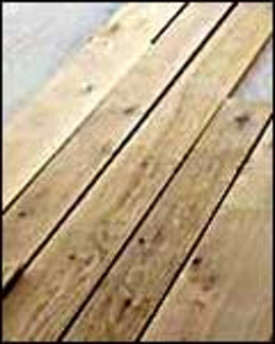
 This recovered plank flooring has been milled with a tongue-and-groove profile, and face nailed for authenticity. |
Face Nailing
Though not as common as blind nailing or screwing and plugging, face nailing is another method for plank flooring. Ring shank common nails are the best choice for structural integrity. For the best installation, nails should be aligned with the previous nails, and evenly spaced. If the floor is also glued to the subfloor, a wide selection of nails may be used. Copper, square-headed cut nails, and other decorative nail heads add accent and authenticity to wood floors.
A smooth-face hammer should be used when face nailing floors. Any stray hit will leave a dent in the surface of the flooring. While some older floors actually look better with a few dents and nicks, unwanted hammer dents should be removed. To do so, place a damp cloth on the spot and apply pressure with a hot iron. This will raise the damaged surface of the wood back to the common surface.
Credit: Renovate Your World


