
Materials:
Step 1: Widen the crack
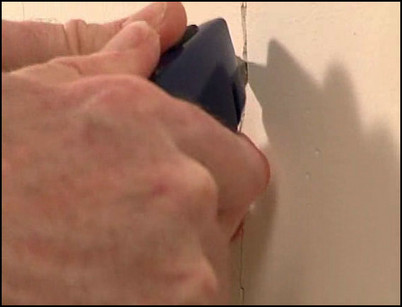
First use a utility knife to widen and clear out the crack. A wider, cleaner crack will give the joint compound a better gripping surface. Use a vacuum to clear the crack of dust and debris.
Use a utility knife to clear out and widen the crack.
Step 2: Prepare the surface
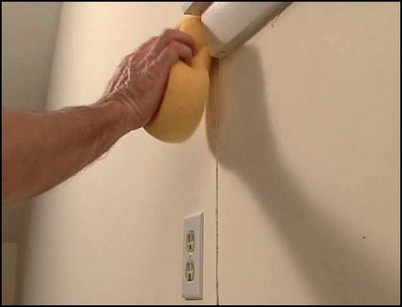
Lightly sand the wall area around the crack using 120-grit sandpaper. This will roughen the surface and make it easier for the compound to adhere. Wipe the crack and wall area with a wet sponge. Keeping the surface damp will help prevent the joint compound from drying out and cracking.
Wet the surface of the wall with a sponge to keep the compound from drying and cracking.
Step 3: Fill the crack with spackle or joint compound
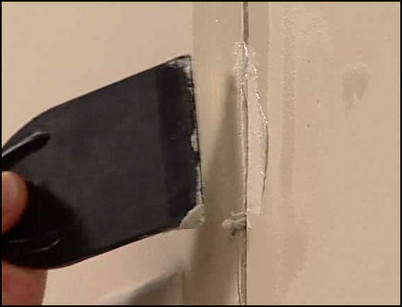
Use a 2-inch putty knife to spread spackle into the crack. Fill the crack and feather the compound out onto the wall. Allow the compound to dry completely before sanding with 120-grit sandpaper wrapped around a sanding block.
Use a small putty knife to fill the crack with compound.
Step 4: Apply and sand a finish coat

Cover any imperfections with a final coat of compound. First wet the patched area with a sponge to keep it moist and provide a good surface for the spackle. Apply the next coat with a 2-inch putty knife and scrape smooth. Allow the compound to dry completely and sand with a 200-grit sandpaper for a smooth surface. Wipe away any dust before priming and painting to match the wall.
Apply a second coat of compound to the dampened surface.


