
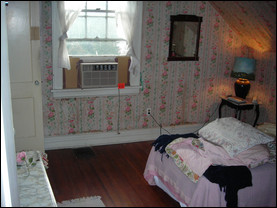
 Traditional pink floral wallpaper covers the walls in the Schmidt’s new master bedroom. Photo courtesy of Mike Schmidt. |
Newlyweds Shannon Schmidt and her husband Mike recently purchased their first home in West Orange, N.J. Built in the 1920s, the California bungalow has character, but according to Shannon needs sprucing up—especially what she calls “the ugly wallpaper.” “It’s a sad little old house that seems to have been ignored for awhile,” says Shannon. “But the wallpaper needs to come down.”
Like typical do-it-yourselfers, the couple surfed the Web and asked friends and family for advice on how to do the job, but they became confused when each source offered a new way of accomplishing the task. “Everybody tells you a different way—scoring it, not scoring it, using hot water, a steam machine, water and vinegar or even fabric softener,” she says.
With so many options, professional Tom Westley, owner of Wallpaper Concepts in Chicago, Ill., understands the couple’s confusion but says that removing those murals or boring boat scenes is really pretty simple. “It’s all about penetrating the papers with water and breaking down the paste.”
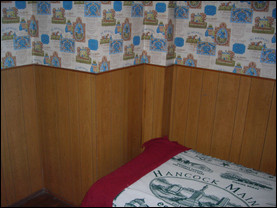 More wallpaper covers yet another room in the honeymooners’ first home. Photo courtesy of Mike Schmidt. |
Breaking It Down
To do so, Westley uses Strip Plus wallpaper stripper combined with hot water and applies it to the wall with a garden sprayer. “You have to let the water do the work,” he says. “A big mistake is to rush the job. The paste is hardened and the only way it will release again is to be softened by water. You might have to spray the water a dozen times until the water has done the work and you can peel the whole thing.”
Mike Morrissey, owner of WPI Decorating of Naperville, Ill., says that most removal methods are just old wives’ tales and although many DIYers use a steamer, it’s a tedious process. “If you have hours of time it will work, but that’s not what we use in the trade; we use hot water,” he says.
During the process, don’t saturate your wall or let the water run. Westley suggests taping newspaper to the bottom of the wall before applying the water so any runoff goes onto the paper and not behind the baseboard.
How long the task takes will depend on several factors, including the type of wall and the style of paper.
“Nothing is going to get through if it’s solid vinyl paper,” says Westley. If that’s what you have, he suggests applying the water and removing layer by layer.
Score!
To help the water penetrate, especially if it’s thicker paper, you might want to use a scoring tool, such as a PaperTiger, to put small perforations into the paper for the water to enter, although not all experts recommend this method.
“Don’t push too hard, though, or the water will get into the drywall,” says Westley, who also suggests working on one wall at a time to prevent drying.
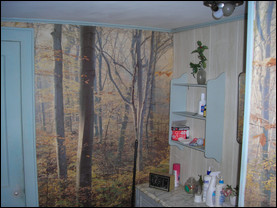 “Who would put a tree mural in a bathroom?” was Shannon Schmidt’s first thought when she saw this wallpaper. Photo courtesy of Mike Schmidt. |
For the Schmidts, whose wallpaper is attached to plaster walls, Westley urges the couple to score it first. “The wallpaper will come off easier on plaster than on drywall and the scoring won’t hurt the wall,” he says.
Once the paper separates, Morrissey suggests using a six- or eight-inch wide blade to scrape it off. “Whether it comes off in one piece or not is strictly a matter of luck,” he says.
Once the paper has been removed, all that’s standing between you and the start of a beautiful new wall is some glue.
“Use your fingernail and scratch the glue,” suggests Westley. “If it comes off easily, you can just spray more hot water in sections and wipe it off.” Stubborn adhesive might need some additional water and wait time as well.
Westley cautions that removing the glue is a vital part of the project. “People think they get the paste off and paint the room, but months later they see that the paste has attacked the paint, causing a chemical reaction and the paint starts to release and break off,” he says. “Look sideways at the wall and make sure you get it all off.”
Patience, Patience, Patience
Shannon Schmidt is going to learn what Shannon Thomason of Birmingham, Ala., already knows—removing wallpaper is a game of patience.
“In my kitchen, there were three kinds of wallpaper, all at least 25 years old and yellowed with time and grime,” explains Thomason, who used the fabric softener and water method, combined with a steamer.
“It was almost like a patience game—get it damp, steam it, use a tool to get a corner to turn up with the steam, then very, very slowly begin to peel/scrape up,” she says. “The bathroom was hellish. The wallpaper stuck firmly to the wall and would not peel off. It took tons of time and patience. I took a lot of sheetrock off with it in one bathroom, which led me to believe the wallpaper had been placed directly onto the sheetrock with no primer.”
Once the wallpaper and paste have been removed and you’re ready to begin the next phase of your project, Morrissey suggests taking a break.
“Wait before you prime or do your next project because you want the wall to be dry,” he says. “Most people are tired when they are done with the job and should just start fresh the next day.”
Credit: Renovate Your World


