
Since they first appeared in homes in the 1970s, concrete countertops have continued to add value and sophistication to rooms with their affordability and natural composition. According to Concrete Network, a resource for
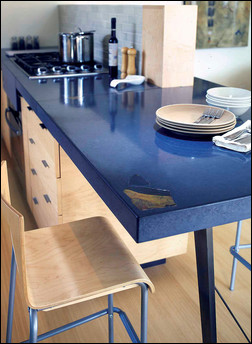 Inlays add a personal touch and make concrete countertops unique to the owner. Photo by Matthew Millman, courtesy of Taunton Press. |
homeowners and DIY-ers interested in concrete construction, a standard 1.5-inch-thick countertop costs from $65 to $135 per square foot compared to granite and engineered quarts countertops that range from $100 to $200 to buy and install.
Made of materials like cement, crushed stone and gravel compiled from local sources, concrete countertops are free of chemicals and other hazardous matter, which ensures a safe and environmentally savvy design. They’re also an environmentally conscious purchase because most packages of concrete are bagged locally, which means that the retailer can cut transportation costs and the product’s carbon footprint.
Why Concrete?
Concrete countertops possess other qualities that make them an ideal installation in kitchens and bathrooms. Unlike granite countertops that are susceptible to stains, concrete is stain-resistant after it has been sealed with a sealer, which closes off pores in the surface after the concrete has cured, or hardened. Concrete countertops that haven’t been sealed or waxed are resistant to heat, unlike their synthetic solid or laminate counterparts, which make them an ideal addition to the kitchen.
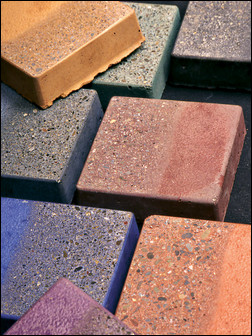 Concrete countertops come in a variety of earthy tones from amethyst to jade. Photo by Matthew Millman, courtesy of Taunton Press. |
Concrete countertops also allow for creativity. Because concrete can be molded freely, everything from the shape to the edges of the countertop can be customized according to the purchaser’s artistic vision. Pourfolio Custom Concrete, a concrete design company in San Diego, Calif., creates countertops with octagonal edges and accented indents and crevices where a soap dish can sit. Two Stones Design, a concrete countertop manufacturer that serves the Chicago area, has embedded cutting board molds and other inlets into one of their countertop designs.
“There’s a little art to it,” says Fu-Tung Cheng, award-winning designer, creator of Cheng Design and author of Concrete Countertops Made Simple. As a struggling artist in 1985, Cheng experimented with concrete countertops to “create something special and save money.” Since then, Cheng has refined his craft by incorporating nature’s design and the principle of acting locally into his work. His countertops emulate the contours of the California coast or the aesthetics of a Japanese rock garden and come in a variety of earthy colors from amber to indigo. Cheng also introduces techniques of inlaying memorabilia such as seashells, tiles and even machine parts on to the countertop’s surface to create a countertop that is unique to the owner.
“You are doing yourself and the Earth a small favor,” says Cheng, referencing the way concrete countertops are bought and made. Every order his business receives elicits an email from them to the concrete mix distributor closest to the customer, which cuts carbon footprints and transportation costs.“It’s greener, more affordable, potentially healthier and a lot more fun than buying monotonous granite countertops that are mined, fabricated and shipped by boat from faraway countries,” he says.
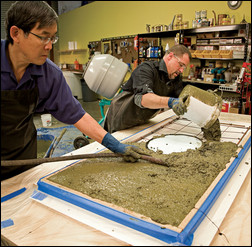 Concrete manufacturer and designer Fu-Tung Cheng brings shape to a countertop as he smooths concrete mix into a mold with a helper. Photo by Matthew Millman, courtesy of Taunton Press. |
Do It Yourself
DIY-ers are increasingly drawn to concrete countertops because of their customizability, according to Concrete Décor, a magazine that follows trends in concrete manufacturing and design. Artisans interact closely to help customers realize their desired design, which also makes concrete countertops attractive.
A simple countertop can be made over the course of two weeks, Cheng says. Depending on how hands-on you are, the process may seem shorter or longer than your usual half-day DIY project, but in the end, your concrete countertop will be a timeless addition to your home.
When Cheng struggled to break the concrete countertop scene years ago, a customer who took an interest in his work helped launch him into the limelight. To give back and to share his craft with others, Cheng offers workshops for DIY-ers who want to build their own concrete countertops. He simplifies the once-complicated process in his book and offers helpful tips for the everyday DIY-er.
Getting Started: Basic Tools
The essential tools to construct and refine your concrete countertop are a drill, a hot glue gun, a felt-tipped marker for measurements, a SPEED
®
 Concrete Countertops Made Simple courtesy of Fu-Tung Cheng and Taunton Press. |
and finishing the concrete like an electric- or gas-powered mixer, a vibrator that will remove trapped air in the pits of the concrete surface when it finishes and a variable-speed polisher with a suggested speed of 900 rpm to 2,700 rpm. He recommends a double-insulated orbital sander that is used with a ground fault circuit interrupter on a grounded outlet to avoid severe electric shock risks.
The Template
The construction of a concrete countertop begins with a template, which will lay the foundations and act as a blueprint.“I make my templates by hot-gluing together strips of an eight-of-an-inch-thick lauan plywood,” Cheng says. Measure the dimensions where your countertop will be installed. Cheng says to cut the template for the base a half-inch shorter than the depth of the desired space on which you will place the countertop, which allows for smoother installation.
Place three-inch-wide lauan plywood strips the length of the desired countertop along the back and front lengths of the area. On top, glue plywood strips with the desired depth dimensions along the left and right sides of the countertop space. Make sure to take into account measurements for an overhang, which allows the cabinetry underneath to “tuck in” beneath the countertop and prevents any sink water from dripping into the drawers. Cheng suggests giving two-and-a-half inches for the overhang.
Creating the Concrete Mold Base and Knockouts
Next, flip the template over and re-mark all the knockout measurements. Knockouts are the holes or crevices of your countertop where everything from the sink to the faucet to a creative addition like a sponge holder will go. Because the countertop will be made face-down in the mold, the measurements must be transferred to the other side of the template. Cut a Melamine baseboard wrapped in durable plastic into the size of the template and transfer the knockout dimensions to the baseboard.
“Now’s a good time to break out your digital camera and take a photo of the template,” says Cheng; taking a photo will keep track of progress. After you’ve
accurately transferred the knockout measurements, caulk the sink knockout in its marked position. To install the faucet knockout, use a drill or a driver. Cheng says to remember that the larger disk will face the ceiling and will form the recess for the nut that will hold the faucet in place.
Ready-made sink knockouts for popular sizes are available in stores. For a custom sink knockout, stack rigid-foam insulation sheets the desired thickness of the countertop and cut out the shape of the opening of the sink. Cheng says that the sink will come with a paper template showing its dimensions so DIY-ers can trace it as they cut the edges of the knockout.
Ready-made faucet knockouts are also available in popular sizes, but for a custom faucet knockout, stack a one-and-three-eighths of an inch disk of plywood or foam on one that is two-and-seven-eighths inches in diameter. Tape the smaller disk atop the bigger one. Cheng suggests wrapping the knockouts with thin packing foam and packing tape so that pulling the knockouts from the concrete mold will be easier.
Innovative DIY-ers can create soap dishes and affix drain knockouts by using a Masonite hardboard for the soap dish and placing a wood dowel cut in half from the soap dish to the sink knockout, which will serve as an affix drain.
Finishing the Mold
To avoid wasting material, use the remaining Melamine from the base to cut sidepieces, which will serve as walls for the mold. Cut two, three-and-one-fourth inch-wide sidepieces and two, two-inch-wide backers that will form an “L” shape to support the walls when the concrete when is poured.
Attach the sidepieces to the baseboard by drilling drywall screws into the edge of the baseboard. Repeat to attach the other sidepieces. To secure the walls, attach the L-shaped Melamine pieces. Cheng says to use one-and-one-half-inch-long screws because the tips of longer screws could pop through the side of the mold.
Next, use blue painter’s tape to mask all the joints of the mold, keeping the edge of the tape one-eighth of an inch back from both sides of the joint. Squeeze a fourth-of-an-inch bead of caulk evenly around the mold. Cheng says that tilting the tip of the caulk gun to a 45-degree angle with help the flow and make for smoother application of the caulk.
Use a wetted finger to smooth the caulk at the joints. Be careful not to push down too hard. Then, peel the tape while the caulk is still wet and let the silicone form for several hours.
 Photo by Fu-Tung Cheng for Taunton Press in Concrete Countertops Made Simple |
To strengthen the countertop, Cheng suggests installing steel reinforcements to the mold. Depending on the length of the countertop, lace strips of rebar together to form a truss around the perimeter of the mold. When installing wire mesh, make sure to clip out knockout dimensions before securing the end of the wire over the walls of the mold on to the melamine board with drywall nails.
Pouring the Concrete
To make the concrete mix, Cheng suggests buying high-strength, 5,000-pounds-per-square-inch bagged concrete like Sakrete’s 5000 Plus Concrete. A safe concrete mixture comprised of Portland cement (the most common type of cement mix), sand and gravel, Sakrete 5000 Plus Concrete costs approximately $5.00 for a 50-pound bag. Cheng says four to six sacks will be needed to complete a concrete countertop.
After assembling all the materials and tools needed to mix the concrete, wear a dust mask and gloves and pour the concrete mix and admixtures into the mixer. Admixtures often comprise of coloring, decorative aggregate (mixed stones) and fibers to embellish and strengthen the countertop. To avoid a dust invasion, secure a piece of plastic with a bungee cord over the opening of the mixer. Once the mixer has evenly distributed the concrete, add the amount of water recommended on the bag of concrete mix and let the mixer run for several minutes. “The mix may first appear lumpy and dry, but don’t be tempted to add lots of water right away,” says Cheng. Concrete with too much water in the mix will crack and shrink as it is left out to dry.
After making sure that that clumps are broken up, let the concrete rest for two minutes and then continue running the mixer. After about 10 to 15 minutes, Cheng says that the concrete should be the consistency of runny oatmeal.
Recruit a helper to pour the concrete mix into the mold. Use gloved hands to spread the concrete evenly into the steel reinforcements and around the knockouts. Make sure that no concrete covers the sink knockout. When the mold is about two-thirds full, work the vibrator back and forth beneath the surface of the mold for several minutes. When the mold is slightly overfull, jiggle the pour table to help settle the concrete.
Smooth the surface of the mixture by applying a steady downward sawing motion with a two-by-four piece of wood.
After pushing the excess concrete off the table, glide a steel concrete trowel across the surface of the concrete using the excess concrete.
Leave the concrete to cure, or form, in a warm, humid environment between 60 to 90 degrees with 25 percent or greater humidity.
Removing the Countertop from the Mold
Begin by removing the L-shaped Melamine braces that supported the walls of the mold and take out every screw that held the mold together. Next, carefully pry out the faucet knockout, avoiding direct contact with the concrete. Then, round the edges with a file. Repeat the filing process for the other edges of the countertop.
In order to remove the base Melamine board from the bottom of the countertop, gather helpers (who should be wearing gloves) and place some foam cushion blocks where the countertop will be placed when flipped over. Cheng suggests flipping the countertop in two steps; first, by flipping it into a vertical position before allowing it to land on its backside on the foam blocks. Once the Melamine baseboard is removed, pry out the rest of the knockouts.
Use a single-edge razor to scrape away the caulk or excess concrete that’s covering knockouts. Leave the countertop to cure again for two to three days in the same humid conditions as before. Cheng says that the longer the curing period, the harder the concrete will get.
Polishing and Slurrying
Polishing the surface will eliminate blemishes and emphasize the fine sand and any decorative aggregate from the admixture, according to Cheng. Use a diamond disk mounted on a variable-speed polisher to polish the surface.
After polishing the entire surface, fill any holes that appear on the surface of the countertop with slurry. Wet the countertop with water and apply the slurry to the surface using a putty knife. Scrape off any excess slurry and let the countertop cure for another two days.
Sealing and Waxing
Since concrete is a naturally porous material, seal and wax the surface to make the countertop stain-resistant. Topical sealers are resistant to stains but tend to scratch and peel. In order to remove a topical sealer, noxious chemicals must be used, which could be a health hazard. Cheng suggests using a water-based acrylic penetrating sealer instead, which is the most food-safe penetrating sealer but will leave the countertop susceptible to such acid stains as lemon juice, wine and vinegar. Cleaning and recoating the countertop can remove these stains.
Before applying the sealer, make sure the countertop is clean. Swirl the sealer, which has been diluted with water in a 50:50 ratio, in circular motions on to the countertop. Repeat the process with undiluted sealer. When the entire surface of the countertop is covered, wipe off the excess sealer with a clean rag.
Use a clean cloth or towel to apply the wax on to the countertop surface in circular motions. Wipe off all the excess wax to avoid leaving streaks. After letting the wax dry for two to three minutes, apply the polish to the countertop using a clean cloth.
Installation
Make sure that the counter or cabinet that will support the countertop has proper reinforcements to support the hundred-something pounds of concrete. Reinforcements can be made by adding vertical and horizontal plywood behind and underneath the counter space or by adding detachable feet to the bottom of the counter or cabinet.
Recruit some helpers again. Carefully plan the path from the workstation to the counter or cabinet where the countertop will be installed.
“Get furniture and other obstacles out of the way, and talk about any potential trouble spots,” says Cheng. He also suggests using a dolly padded with carpeting to transport the countertop through your house.
After the countertop has been installed, clean up the area and take a rest. While this project may take a little longer than other DIY projects, Cheng says that in the end, “it’s about having fun.”
For more information about concrete countertops, read here.
Credit: Renovate Your World


