
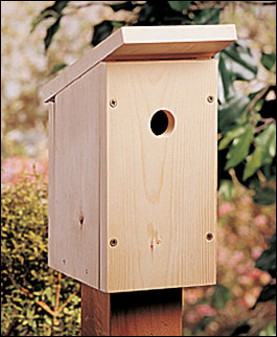
 This simple birdhouse is the perfect choice for a first project. |
While this birdhouse is as simple as it gets, it has a lot going for it. It can be made very quickly…uses minimal materials and tools…and boasts a sleek look that will make any budding woodworker proud to say, "I built it all by myself!"
Here’s What You’ll Need
- One 5-foot 1- x 6-inch No. 2 pine board
- 1-5/8-inch galvanized deck screws
- 2-inch galvanized finishing nails
Recommended Tools
- Power drill
- Appropriate-size spade bit
- Hand saw
Let’s Saw That Board!
- Using the full width of the 1-inch x 6-inch board, cut out the pieces as shown in the board layout below.
- Drill a centered entrance hole about 2-1/2 inches from the top of the front piece. For eastern and western bluebirds, the hole should be 1-1/2 inches (for areas with mountain bluebirds, use a 1-9/16-inch hole). Chickadees and tufted titmice prefer entrances of 1-1/8 and 1-1/4 inches, respectively.
- Attach the front to the sides with 1-5/8-inch deck screws. Predrill the holes in the front piece to prevent the wood from splitting. After nesting season when it’s time to clean out the birdhouse, remove these screws for easy access.

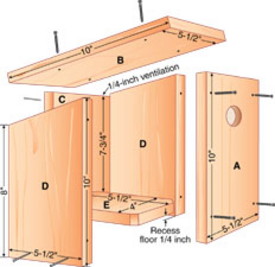
Attach the back to the sides with 2-inch finishing nails. Predrill the holes, making sure each one is straight.
- Cut about 1/2 inch off each corner of the floor for drainage.
- Recess the floor 1/4 inch up from the bottom of the house, then attach it with 2-inch finishing nails from the sides and back. Do not nail the floor from the front or you won’t be able to open it for cleaning.
- Attach the roof to the sides with 1-5/8-inch deck screws.
 |
You’re finished! Your board is now a birdhouse.
Ready to tackle something more challenging? BirdsandBlooms.com features a variety of birdhouse plans guaranteed to make your backyard the most popular avian address in town.
Credit: Reiman Media Group, LLC


