 |
The life of a roof can be extended with regular inspection and small repair. Conducting a roof inspection once or twice a year can help prevent moisture damage, which in turn can save a household thousands of dollars.
Follow these ten steps to ensure a healthy, leak-free roof and gutter system.
Materials Needed:
- Ladder
- Flashlight
- Binoculars
- Caulking
- Roofing cement
- Roofing repair tape
- Plumbing boot(s)
- Replacement gutters and/or parts
1) Investigate the Attic
Inspect the attic, preferably on a rainy day. After at least 30 minutes of rain has fallen, take a flashlight into the attic and look for leaks.
2) Look for Water or Stains
Check the rafters, eaves and ridges for dripping water or stains. Check all the vents and plumbing pipes. If you see daylight, it’s an indication that there may deterioration. Take note of any leaks, stains and areas where daylight can be seen.
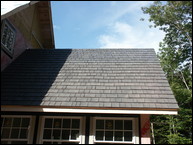
3) Inspect Roof from the Ground
With a pair of binoculars, stand back from the house and inspect the roof. Look for shrinking and curling shingles as well as shingles that are slipping or out of place. Note fallen or sagging branches that are in contact with the roof and/or gutter. Look for loose or damaged flashing around chimneys, vents and skylights. Circle around the home conducting this inspection with binoculars. If possible, conduct this inspection in both morning and afternoon lights.
 Follow the ladder safety guidelines before climbing the roof. |
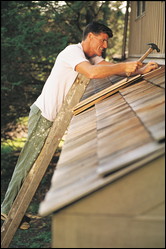
4) Climb to the Roof for Closer Inspection
Ascending to the roof should only be done in favorable conditions and if you are comfortable with heights. (If the roof is wet or extremely hot, it is wise to wait for another day. Hot shingles can become soft and will tear out under the added weight and stress of a body.) If you are uncomfortable climbing to the roof, hire a professional.
As a general rule, you should not climb a roof that has an 8/12 roof pitch or greater. An 8/12 pitch is one that rises 8 inches for every 12 inches of horizontal run.
5) Follow Ladder Safety Steps
Before climbing on a ladder or a roof, be sure to take the following precautions:
- Position the ladder on solid and level ground.
- Inspect the ladder for damage. Be sure all rungs are intact and secure.
- Secure the ladder at the top to keep it from slipping.
- Angle the ladder back 1 foot from the house for every 4 feet in eave height.
- Give the top of the ladder at least 3 feet of clearance beyond the gutter when positioning it into place.
6) Inspect Shingles
As you did on the ground, inspect the shingles for curling, bucking, blistering and discoloration. If you notice an inordinate amount of shingle granules in the gutters, this can be a sign that the roof as a whole needs re-shingling. (Granules add to the weight of the shingles and help protect them from ultraviolet rays.)
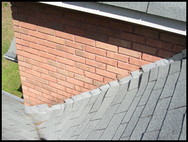 Inspect flashing around chimneys, in valleys and where the roof meets walls. |
7) Inspect Flashing
Up on the roof, you’ll have an easier time giving the flashing a more thorough inspection. Investigate the flashing around chimneys and plumbing and/or furnace vents. Flashing may exist in areas where the roof meets a wall or another roofing plane. Unfortunately, flashing is one area where roofing contractors tend to cut corners. Caulking, roofing cement and roofing repair tape can serve as a temporary solution for leaks around flashing, but replacing the material is the best bet for a longer-term leak prevention.
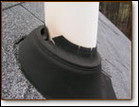 Inspect and, where possible, replace plumbing boots. Consider hiring a pro for this job. |
8) Replace Plumbing Boots
Plumbing vents often feature plumbing boots designed to create a leak-preventing seal. These are designed to last about 10-15 years — less than the life of a typical roof. Plumbing boots are inexpensive to purchase, although it is advisable to have a roofing contractor replace all plumbing boots in one visit.
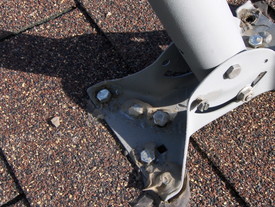
9) Inspect Satellite Dishes
Poor installation of satellite dishes can often result in roof leaks. If your home has a satellite dish, check the installation site for roofing damage and signs of leaks. If found, consider using a roof-friendly mounting system that comes with built-in flashing and uses head screws.
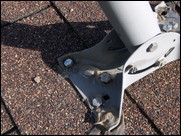 Ensure that satellite dish installation has not damaged the roof. |
10) Inspect Gutters
Gutters play a vital role in the longevity of the roof and the prevention of water infiltration on the roof and elsewhere in and around the home. Check the gutter system for leaks and cracks. Leaf guards are sometimes installed poorly, resulting in leaks. If your gutter system includes a leaf guard, inspect its installation for signs of roof damage or leaks. For a more thorough look at Gutter Inspection and Cleaning, watch this video.


