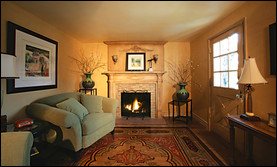
 Adrienne van Dooren’s living room before floor restoration. Photo credit: David Galen |
The old adage “what once was old is new again,” also applies to old wood floors that are in desperate need of attention. Don’t rip them out and start from scratch. Instead, consider restoring and refinishing them. Most experts say that restoring hardwood floors is a do-it-yourself project, with sanding the floor being the trickiest part. With a little preparation and hard work, you just might find a hidden treasure.
“I hear many people talk about ripping out floors to put in bamboo and help save the Earth,” says Gregg Steiner, founder of greenlifeguru.com. “But if you have a perfectly good hardwood floor, restore it and make it beautiful. It’s already installed, you’ll save a fortune and you’ll be using resources that are already there.”
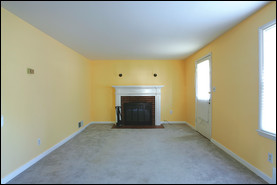
Adrienne van Dooren of Asheville, N.C., and author of the book, The House that Faux Built: Transform Your Home with Paint, Plaster & Creativity, bought a fixer-upper to benefit Hurricane Katrina victims and realized that she didn’t have to rip everything out and start over. Instead, she worked with a team to restore a 1940s parquet floor that was badly damaged by cats, water and paint.
 Adrienne van Dooren worked with a team to restore a 1940s parquet floor that was badly damaged by cats, water and paint. Photo credit: David Galen |
“The damage was so extensive that two floor companies said ‘no hope, rip it out,’ but instead we sanded, bleached and used Modello Designs stencils to make the floor look like an inlay wood Oriental carpet,” she said. “We went from eyesore to stunning without ripping it out!”
Proper Preparation
Before starting, van Dooren prepared by reading up on the process of restoring hardwood floors and talking with experts. The project took only two days, although van Dooren did get some professional sanding help.
Your first step is to remove existing flooring that is covering the hardwood. Then, clean the floor with a standard wood floor cleaner, allowing it to dry thoroughly. Steiner recommends using earth-friendly wood floor cleaners that are non-toxic. Rich Morrell, brand manager of Cabot, says to turn off the heating and air-conditioning or it will make the dust and contaminates airborne.
“Review the floor by getting down on your hands and knees,” says Morrell. “Then, reset the nails to below the surface of the floor and fill any holes with wood filler.”
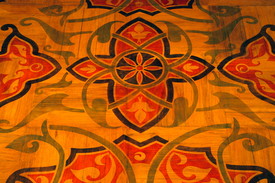 Another view of Adrienne van Dooren’s restored hardwood floor. Photo credit: David Galen |
The floor then needs to be sanded, or smoothed out, but this is the tricky part because using a commercial sanding machine improperly can leave tragic results on your beautiful floors.
“Those are pretty aggressive machines that are better left to a pro,” says Morrell. “They are heavy and cumbersome and, if not used properly, they can leave gouges in the floor. Once you make one, there’s no going back.”
There are several sanding choices: Hire a professional to sand the floor or rent a random orbit floor sander, which, says Morrell, is far less risky. “Guide the random orbit sander in no particular pattern until all of the finish is removed,” he says “Take finer grit paper, and repeat the process. Then, go to an even finer grit, 80 or 100, to smooth the wood before finish is applied. Be sure the surface is completely clean and wipe the floor of sawdust and surface contaminants.”
If your floor is in good condition and just needs a new coat of urethane, you can also lightly buff the floor to remove the top layer before reapply. Liquid sanders are another option, which are poured onto the existing floor and eat away at the lacquer, leaving a residue that is just wiped away. However, liquid sanders cannot be used on bare wood and may have other limitations so be sure to read the bottle.
Successful Staining
Before staining the floor, which Morrell says is a fairly time-consuming process with no shortcut applications, spend some time thinking about the color and sheen of stain you want. There are several options to consider, including sheens ranging from dull to satin and durable oil-finish or water-based finishes, which have a tendency to dry quicker. Water-based finishes may also take several coats of application before achieving the color you desire.
“The dull stains are more popular in the hallway and kitchen because they don’t show scuff marks as much as the high gloss finish,” explains Morrell. “The high gloss finish—or the wow factor—is really used on sports floors or where there is a low traffic area.”
Before applying the stain, test the color on a piece of scrap wood. “Unlike paint once wood stain is on the floor, you’re stuck with it,” he says.
Don’t shake the can, which can result in air bubbles. Stir the contents and, once you start, don’t stop. Use a synthetic-based pad or preferably a brush to apply. Don’t use steel wool as it can leave flakes and rust.
“You have to start it on one side of the room and work your way across,” Morrell explains. “If you stop in the middle, you end up with an overlay mark.”
Drying agents can be added to a stain to quicken up the drying process.
Once the job is complete, it’s important to maintain the floor on a regular basis to keep its luster. Maintenance depends more on the finish than on the type of wood. “High gloss (shiny) surfaces will show dust, dirt and scratches much faster than low gloss (flat) surfaces,” says Howard Brickman, a wood flooring expert with the Institute of Inspection, Cleaning and Restoration Certification in Vancouver, Wash. “Also, light or neutral-colored floors don’t show normal household dust as quickly as dark-colored floors. Shiny dark floors will need more frequent dusting to look clean.”
Keeping It Clean
Basic daily care should include dusting, vacuuming and cleaning up spills. “Every two weeks or so the more compulsive house cleaners will probably want to perform a light cleaning with a cleaner specially formulated for use with wood floors,” says Brickman. He also urges consumers to stay away from general purpose or wood furniture type cleaners on floors as they may either contain wetting agents or waxes, which are not good for the long-term condition of the floor.
“If the wetting agents get past the finished surface they will causes the exposed surfaces to swell, which can cause the surrounding finishes to prematurely fail,” he says. “Wax will contaminate the surface, which can cause any future attempts to apply finish to fail to dry or adhere properly. Grit that is left on floors will scratch the surface as traffic grinds it in.”
Flooring is expensive and tearing it out doesn’t necessarily mean you’re doing the Earth any favors either. Repair what you have and shine it up and your floors can be good as new—and, like van Dooren’s, even better!
Credit: Renovate Your World


