 Lead paint removal often means damaging centuries-old detailing. New options help prevent dangerous lead exposure and destructive abatement practices. |
With lead present in an estimated 75 percent of all homes in the U.S. and lead poisoning ranked as the number one environmental hazard for children in the United States, finding a safe, economical way to reduce the risks of lead exposure has become a mission for parents and paint companies alike. Windows, trim, molding, handrails, walls, and woodwork bring character to our homes, so finding a way to preserve a home’s original architecture while protecting our kids has become the focus of recent product development.
There have been huge strides in the lead containment field in the past decade. Whereas parents of young children once faced the daunting and expensive chore of removing lead paint completely, the home front has brightened considerably. A whole host of products now help homeowners contain lead paint while maintaining their beautiful old homes and woodwork. What’s more, liquid coatings created to encapsulate lead paint are now available in non-toxic, low-volatile formulas that clean up with soap and water. Families no longer need to move out in order to contain lead hazards, they need only cover the furniture and prep for a home painting style project.
Why Encapsulate
Encapsulation, or the application of a liquid coating that dries to form a watertight jacket over the lead paint, is easy, cost effective, and homeowner friendly. Encapsulating rather than removing the lead paint generally saves homeowners 80 percent of the cost associated with lead paint removal. Since the paint is not disrupted, it won’t stir up lead dust or increase the risk of contamination. It is applied like paint, and can be done by the homeowner. Encapsulation also provides long-lasting effects such as a beautiful, paintable, and tintable finish that protects the wood and preserves architectural details. All encapsulants must pass federal standards and supply a 20-year warranty. On average, these encapsulants cost less than .50 cents a square foot, which far is more economical than the $1 to $15 a square foot estimates associated with removal or encasement.
Applying Encapsulants
Whether you choose an encapsulating system that includes primer, coating and topcoat, or a single-component encapsulant, professionals recommend stabilizing any loose, chalky, or flaking paint. There are a number of products available that claim to reattach or reinforce existing paint finishes, but homeowners may choose remove loose paint in accordance with HUD and EPA guidelines. High-gloss surfaces may even require a brush-on liquid sand or deglossing product to promote adhesion. The prepared surface is then “painted” with the liquid encapsulant in a matte or eggshell finish. For a high gloss-finish, companies offer topcoats to provide gloss and additional impact resistance.
The encapsulating paint called ChildGuard also contains the additive Bitrex, which makes the coating bitter to the taste to discourage infants from chewing on the coating. Encapsulants differ in terms of how thick they must be in order to provide adequate containment. ChildGuard, for example, is an effective barrier at 7 mils dry, a thickness that allows architectural detailing to stand out. Some other products must be applied to 14 or 16 mils dry to achieve abatement levels, so take the time to research your options. As a benchmark, the average coat of paint has a thickness of 5 mils dry.
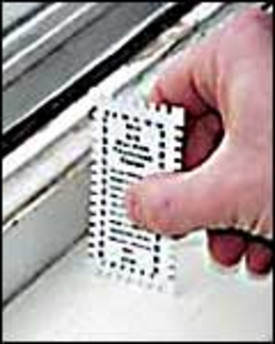
 Encapsulating paints must be applied to a manufacturer-specified thickness. Improper application will not adequately contain lead-contaminated paint. During application, a special gauge is used to measure paint thickness. |
Do It Right
When applying an encapsulant, you must follow the manufacturer’s specifications for thickness of application. If the encapsulant is not applied to the recommended thickness, abatement and compliance are not achieved, and warranties are void. The precise thickness of application, both wet and dry, is clearly indicated in manufacturers’ specifications. To check for thickness, use a wet-film thickness gauge to verify proper application. These marks are easily brushed out, but allow professionals and do-it-yourselfers alike to verify compliance and proper coverage.
Encapsulants are not recommended for all applications, however. Since friction will wear away the protective coating and render it ineffective, homeowners should not use them on window sash, doorjambs, or high traffic areas where abrasion is going to occur. For these surfaces, homeowners should manually or chemically remove the paint, or physically remove the painted item.
What to Do if Damage Occurs
If the topcoat is damaged in any way, it must be repaired and the open spot re-encapsulated. Fiberlock recommends that homeowners feather sand the edges then reapply the encapsulant to the required thickness. For higher traffic areas such as railings or chair rails, homeowners may opt for a high-gloss topcoat for additional protection. To be certain you’ve properly contained the lead hazards, hire a lead inspector to oversee your project and document the results.
Editor’s note: tommymac.us does not endorse any product or products intended for lead abatement. Homeowners should consult local professionals to determine if lead paint is present in their home.
Credit: Renovate Your World


