
Materials:
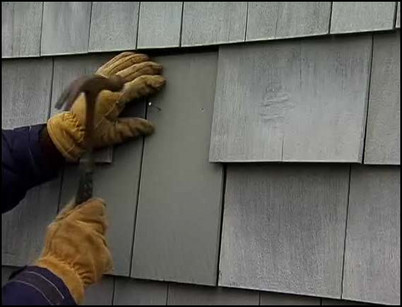
Step 1: Remove broken or damaged shingle pieces.
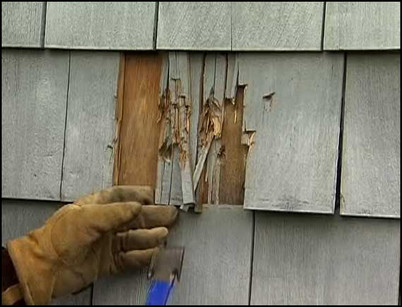
Slide the shingle-ripping bar up and under the damaged shingles. Pry the damaged shingle away from the side of the house gently, and pull the broken pieces off by hand. Be sure not to lift the upper course of shingles too far from the wall, which might crack.
Use the shingle-ripping bar to remove damaged shingles.
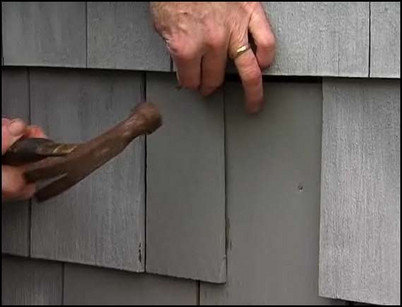
Step 2: Completely remove the damaged shingles.
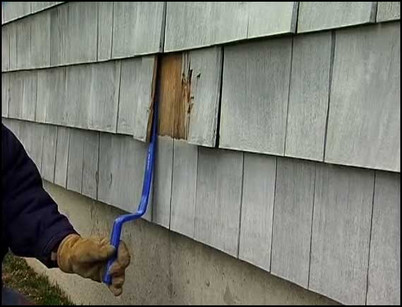
Use the nail-cutting feature of the shingle-ripping bar to completely remove the damaged shingles. Slide that end of the bar up under the shingle, and locate the heads of the nails that secure the shingle in place. Hook the nail-cutting end of the bar around a nail. Give the handle of the bar a sharp blow with a mallet or hammer to cut the nail. With the nails cut, the shingle will pull away easily.
Hit the handle with a hammer to cut the nail.
Step 3: Stain or paint the new replacement shingles.
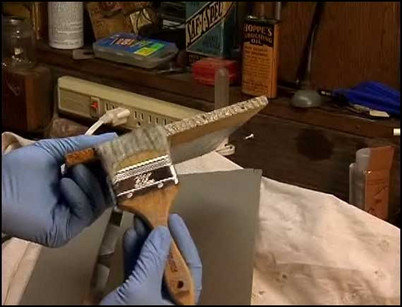
If replacing only a few shingles, stain or paint them before installing to prevent curling or cupping. Paint the front, back and sides of the shingles. Be sure to thoroughly coat the exposed bottom edge to prevent moisture from wicking up into the shingle.
Thoroughly coat the exposed bottom edge.
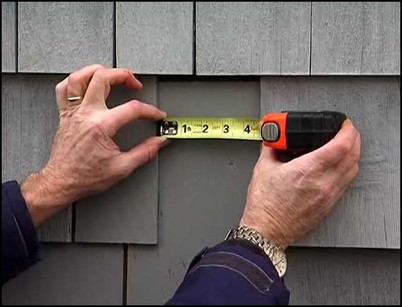
Step 4: Dry-fit the new shingles in place.
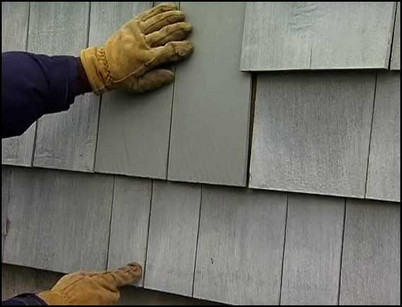
Position the new shingles in place. The space in between shingles should be at least an inch or more from the spaces between shingles in the courses above and below. This ensures that water running through a crack will land on the outer surfaces of the shingles in the course below. There should be 1/4-inch of space between each shingle.
Make sure the space between shingles is an inch away from the space in the course below.
Step 5: Install the lower course of replacement shingles.
Using galvanized 8-penny nails, nail the first course of replacement shingles in place. Each shingle should be nailed in place with two nails. The nails should be on either side of the shingle and at least an inch from the edge.
Use two galvanized 8-penny nails per shingle.
Step 6: Install the upper course of replacement shingles.
For the upper course, slide the replacement shingle up and under the existing course above. Center the new shingle in place but leave the bottom of the new shingle about 1/4 of an inch below the bottom of the existing shingles in the same course. Drive two galvanized 8-penny nails into the new shingle. Drive the nails up and under the drip line of the shingle above, and then drive them in at an angle.
Hammer up at an angle to drive the nail under the drip line.
Step 7: Measure and cut remaining shingles.
Some jobs will have spaces that require a narrower shingle piece. Measure the width of the last space to be filled and subtract 1/2 inch to allow for 1/4 inch on either side of the replacement shingle. Transfer the measurements to the prepared shingle. Make sure the line is square and use a hand saw to cut the shingle to size.
Transfer the measurement to the replacement shingle, subtracting 1/2 inch.
Step 8: Install the cut replacement shingle.

Using the same process as in step #6, slide the piece of shingle up and into place, leaving 1/4″ on either side, and leaving the bottom of the shingle 1/4 inch lower than the shingles on the same course. Drive the two nails up at an angle under the drip line.
Leave the bottom of the shingle 1/4 inch lower than the other shingles.
Step 9: Use a 2×4 to align the new shingles.
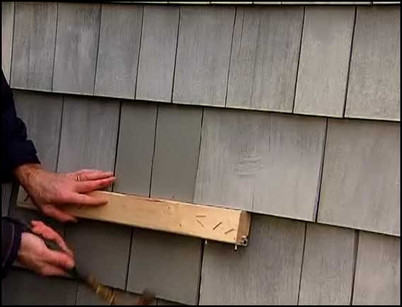
The installed, upper course of replacement shingles should be nailed in place but 1/4-inch lower than the existing shingles of the same course. Place a 2×4 under the new course of shingles and hammer up. This will bring the shingles up into alignment and also straighten out the angled nails. Now, place the same 2×4 over the face of the overlaying shingles and give the board a single sharp rap to set the nails underneath in place. With some touch-up stain or paint, the replacement shingles will soon blend right in.
Hammer up into the 2×4 to bring the new shingle flush with the rest of the course.


