 The history of Mosaic Art is a long and rich one that runs from the simplistic designs of the Sumerians (ca. 200-300 BCE) through the elaborate and awe-inspiring devotional works of the Byzantine empire straight through to today when mosaic art embellishes everything from beverage coasters to vast urban landscapes. While mosaic art has sometimes been given short shrift – often relegated to the category of "craft" or folk-art – those who have put their hands to mosaic art know that it requires as much creativity, vision, skill and tenacity as any other fine art pursuit.
Materials Needed to Complete this Mosaic Project:
(2) 6′ x 6′ Sheets of 3/4 plywood
(6) 1" x 2" x 6′ slats of wood
(1) 6′ x 6′ Piece of 1" Graph Paper (having extra is not a bad idea)
(1) 6′ x 6′ Sheet of Double-Sided Clear Adhesive
(1) 6′ x 6′ Piece of Greenboard (if not already installed on wall)
(1) 6′ x 6′ Piece of Wonderboard (or Cement Board)
(4) C-Clamps
(1) Glass Cutter/Scorer
(1) Pair of Glass Nippers
• Unsanded White or colored grout (whatever your preference)
• Glass, tile, marble or whatever materials you will be using to create your mosaic
• Pencils (regular and colored)
• Liquid Nails (if using mirrored glass, be sure to get the kind specifically developed for mirrors)
While common sense would dictate that beginners should start small, I chose this rather large 6 x 6 shower wall for several reasons. First, smaller projects such as mosaic picture frames or mosaic candle holders are relatively straightforward and can be learned fairly quickly. Secondly, this project uses techniques and materials that include waterproofing so it covers outdoor mosaics as well. Finally, it includes the rendering large-scale representational drawings which is a useful skill to have when tackling projects are intended to be more than abstract or random designs and patterns. Essentially, this project covers a broader range of mosaic techniques, and if you can learn how to create a mosaic like this, you can do just about anything. It was, in fact, the artist’s first foray into mosaics, so it’s certainly not impossible for even the most rank beginner.
The first thing to decide when creating a mosaic is which of the two main methods you wish to use – Direct or Indirect. With the Direct method, the tiles are placed directly onto the surface and then grouted. With the Indirect method, the tiles are placed face-down onto the drawing, backed with a sheet of double-sided adhesive and then mounted and hung once it is completed. It really is a matter of personal preference – whether you like to work on a horizontal surface or a vertical surface, for example – but one practical thing to consider is the level of smoothness you wish to obtain. The Indirect method may work better for mosaic tabletops or beverage coasters, but, again, it is up to the individual. The artist here used the Indirect method because he wanted more control over the design and flexibility in the placement of the pieces. It is also possible to move pieces around when using the Direct method; it is just not as easy.
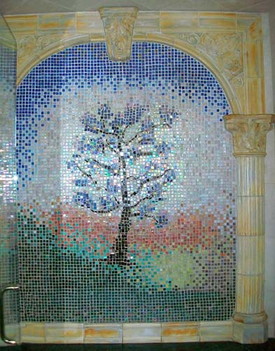
The next step is to finalize your concept and render your drawing. The design for this shower wall is of the Paulownia Tomentosa tree (more commonly known as a "Princess" or "Foxglove" tree). Some artists use scaled drawings on graph paper – especially for larger installation pieces – but if you have the space, an actual-sized drawing on larger sheets of 1" graph paper (as the artist used here) can help you get a better sense of what the final outcome will look like.
Once you have rendered your drawing, including the color scheme, it is time to choose your tile pieces. Colored and stained glass pieces (known as "tesserae") are very popular as are ceramic, marble and mirrored tiles. One great thing about mosaic is that just about anything can be used within the design – coins, buttons, gemstones – you name it. When considering what materials to use, it is wise to think about the space in which the mosaic is to be installed in terms of size, lighting and desired effect. Is it a small space? Mirror always adds dimension. Is it a space that gets a fair amount of natural light? Stained glass can be a wonderful option. Is the space to be one of relaxation and serenity or one of vitality and revitalization? It goes without saying that mosaic installations are labor-intensive, permanent once dry and not easily removed once installed so it is important that all aspects of the design are carefully chosen and executed.
Because the artist used the Indirect method and a life-sized drawing, the next step for him was to create a structure onto which the mosaic could be created. Since the work would need to be clamped and flipped a couple of times (explained later), he first laid 3 slats of 1" x 2" x 6′ wood horizontally on the work surface – one for the top, the middle and the bottom of the structure – and then laid a 6′ x 6′ sheet of 3/4" plywood on top. 3 more 1 x 2’s and another piece of plywood will go on top of the frame once the mosaic is completed, so have those on hand. The 1 x 2’s are both to elevate the frame so that the clamps can be inserted and also to create more equally-distributed pressure during drying time.
The drawing is then placed on top of the 3/4" plywood and it is on this surface that your mosaic will be created. Now is the time to cut your pieces of tile or tesserae according to your design. Since this was a design that had some rather large monochromatic fields, the artist used a few sheets of pre-made tile to make it a little easier. But, in the areas of leaves and branches, etc… the pieces were cut according to how they appeared on the grid and this is by far the part that takes the most patience. An important thing to remember is to leave a few tiles blank (in this case, because of the size, 6 tiles were left out around the edge) so that you can insert screws for mounting to the wall. If you are planning to frame the piece, this is not necessary as you can screw the mosaic to the wall within the frame.
Once all of your tiles are placed, face-up, on your drawing, it is time to lay the double-sided adhesive sheet over the entire surface. This must be done very carefully and then smoothed with a squeegee or a wide spackling knife. This part generally needs two sets of hands in order to be done properly and precisely. Once the double-sided adhesive sheet is laid, the second piece of 3/4 plywood is placed on top along with 3 more 1 x 2’s and the entire frame is clamped and flipped.
Once flipped, the clamps, the slats and the top piece of plywood are removed to reveal the back-side of the mosaic tiles. At this point, the mosaic is ready to be mounted onto the board that will eventually be mounted to the wall. Because this is a shower wall piece, the structure is mounted to a 6′ x 6′ sheet of "Wonderboard," or cement board – a type of board that is suitable for use in damp areas. To adhere the mosaic to the mounting board (and to the wall) the artist chose to use Liquid Nails. And, because mirrored pieces were used for this piece, he used a type of Liquid Nails that was developed specifically for use with mirrors (this has to do with acidity). Many mosaic artists use something called Quik-set, a white, plaster-like material that must be mixed, to adhere their tiles, but this artist works with Liquid Nails for all of his mosaic projects, large or small, because it is ready to go in a handy gun dispenser. This way, you can apply it to each piece individually and not worry about a patch drying too quickly.
The adhesive is spread on the Wonderboard using a saw-toothed trowel and the Wonderboard is then placed very, very carefully on top of the mosaic design. This, again, should be done with two sets of hands to ensure accuracy. Once the Wonderboard is in place, the frame should be reconstructed by placing the plywood and 1 x 2’s back on top and clamping. The entire structure should be flipped again, as quickly as possible.
Once flipped, the clamps, top layer of plywood, and 1 x 2’s can be removed and Voila! There you have your mosaic. This is the time to make any adjustments to the design or re-affix and pieces that may have shifted because Liquid Nails only gives you a minute or two before hardening.
Once you have made any necessary adjustments, the plywood and 1 x 2’s should be re-clamped and the whole structure should be allowed to dry for at least 24 hours. It is a good idea, also, to weight the piece with heavy books or cast iron skillets as an added measure.
Once the mosaic has been allowed to dry, it is now ready to be mounted to the wall and grouted. Because this shower was new construction, it will be mounted to greenboard – a type of drywall used when constructing bathrooms or kitchens – or any rooms – where moisture will be an issue.
To mount the mosaic, another layer of Liquid Nails is applied to the back of the Wonderboard and then hung using 2" wood screws. You can apply the grout as directed and wait at least 24 hours before using the shower.
You now have a wonderful, personalized custom-tiled shower and saved yourself up to $14k (this was a price quoted to the artist prior to his decision to do it himself). Again, mosaic art is very flexible in terms of materials, techniques designs, etc., and while always labor-intensive, once you find your preferred method you can work more quickly. Enjoy!
Artist’s Bio
Formidable business person by day, artist by night, Thomas G. Richter designed and created this shower wall mosaic for his home on the Main Line in suburban Philadelphia. This 6′ x 6′ piece depicting a Paulonia Tomentosa or "Foxglove" tree is made from ceramic, glass and mirrored tiles and took approximately 100 hours to complete (not including the 48 hours of drying time). This was Richter’s first time ever creating a mosaic. He has since completed six works including an outdoor 16′ x 6′ 3600 piece mosaic wall at his 401 Diner in Conshohocken, PA.
The artist considers the process of creating mosaic therapeutic and sees the art of mosaic itself as a great metaphor for the diversity of life: unlikely, random pieces that are but scrap when standing alone but when put side-by-side become an integral part of something beautiful.
Credit: www.tommymac.us


